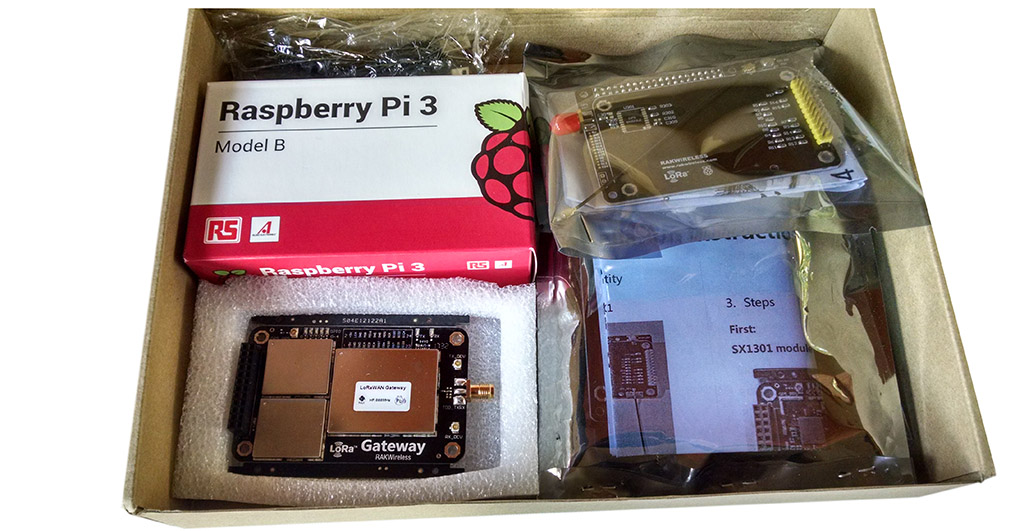
Previously, I covered the Dragino LG01 Single Channel LoRaWAN Gateway, a low cost solution good for testing basic LoRaWAN communication setups. I needed a better gateway and I was about to go for the german IMST IC880A gateway when I stumbled upon a Chinese variant named RAK831, that was cheaper and offering the same features. The RAK831 and the IC880A boards are almost identical in terms of Semtech chips used (SX1301). The RAK Wireless company also provides a KIT including the concentrator board and a Raspberry Pi3, so you have everything that is needed to assemble the gateway. RAK831 is able to receive up to 8 LoRa packets simultaneously sent with different spreading factors on different channels.
Assembling the gateway
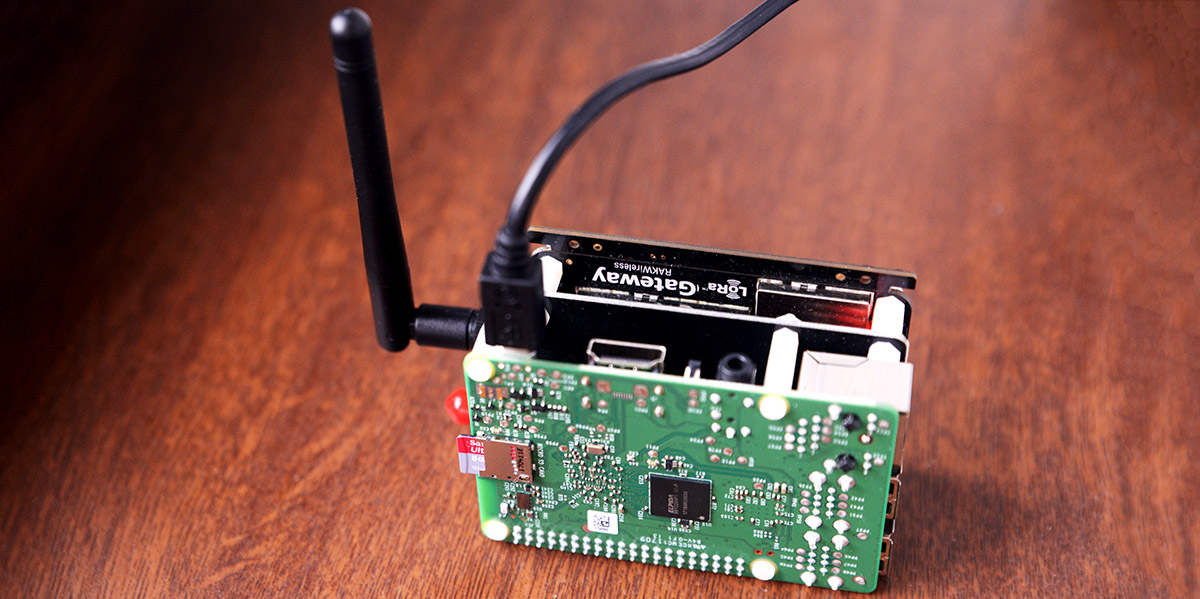
The RAK831 concentrator board must communicate with the Host Processor (Raspberry Pi3 board) via SPI. As both boards have header connectors, the connections can be made with floating wires (dupont wires). A better solution is to use the adaptor board provided by RAK Wireless, that snaps in to both boards. Use the plastic screws to fix the three boards in place. It’s a 5 minute job and the result looks like this:
Installing the gateway software
Here are the steps to make:
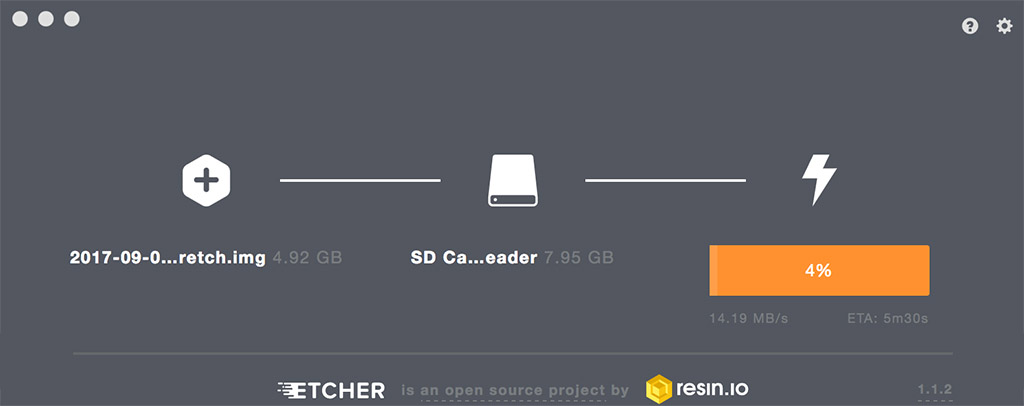
1) Download raspbian image
2) Download etcher
3) Insert the 8GB SDCARD and use etcher to write the image to sdcard:
4) After the image transfer is done, create a file named ssh on the root of the fat partition of your sdcard. This will enable ssh, without needing any monitor/keyboard/mouse
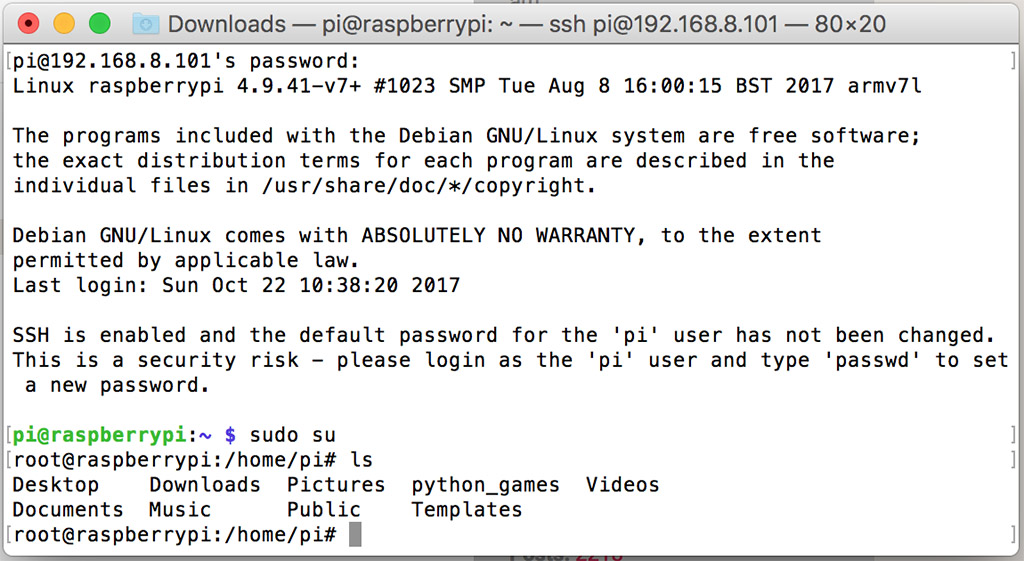
5) Connect the raspberry to your router via a cable, and find its IP in the DHCP table on the router. Open a ssh session to that ip and login with username: ip and password: raspberry . Do a sudo su for root
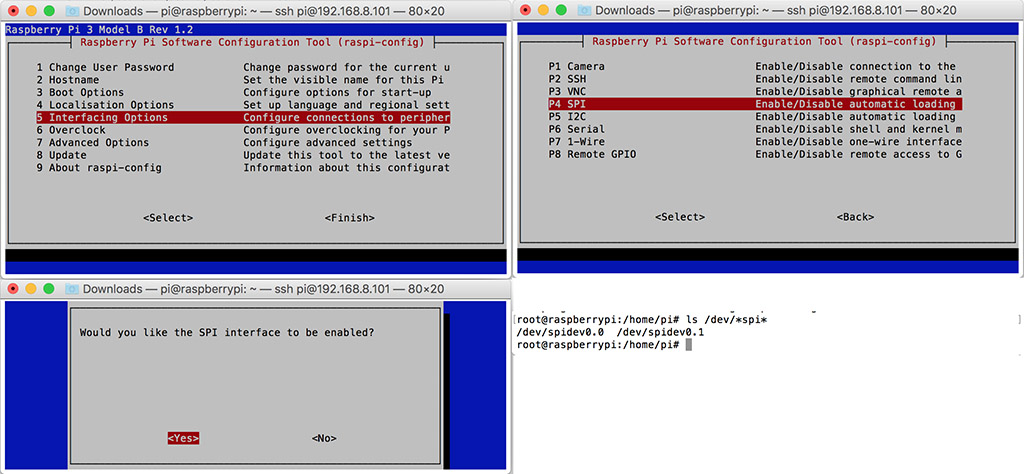
6) Use raspi-config utility to enable SPI ([5] Interfacing options -> P4 SPI) and also expand the filesystem ([7] Advanced options -> A1 Expand filesystem):
Type $ sudo raspi-config to start:
7) Note down the Raspberry Pi3 Ethernet mac address, one place to find it is in the router’s DHCP table you previously checked for IP:

8) Update, upgrade and then install git :
Newer versions will go for IPV6 by default. That is perfectly fine, but in case you want to make the raspberry use IPv4, create /etc/sysctl.d/local.conf and add this single line:
net.ipv6.conf.all.disable_ipv6=1
net.ipv6.conf.all.disable_ipv6=1
sudo apt-get update && sudo apt-get upgrade && sudo apt-get install git -y
9) Prepare the gateway for easy use with TTN Network server. Clone the ic880A repo, yes it will work fine with the RAK831:
git clone https://github.com/ttn-zh/ic880a-gateway.git ~/ic880a-gateway
Enter the directory, and execute the script:
cd ic880a-gateway

sudo ./install.sh spi
The script ends with:
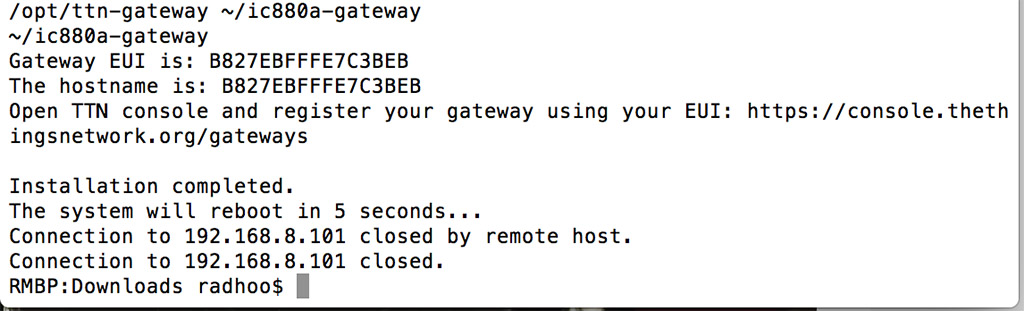
10) Open the TTN Console and register a new Gateway: Console –> Gateways –> Register gateway. Check the “I’m using the legacy packet forwarder” box. Insert the MAC sequence as a unique EUI.
11) To change the backhaul from Ethernet to Wifi (The raspberry Pi3 has it), you can edit:
$ sudo nano /etc/wpa_supplicant/wpa_supplicant.conf
And add the following block at the end of the file:
network={

ssid="The_SSID_of_your_wifi"

psk="Your_wifi_password"

}
12) To make sure the gateway works automatically on every restart, make sure the radio reset pin is properly configured. Go to /opt/ttn-gateway/bin and edit start.sh . SX1301_RESET_BCM_PIN must be set to 22 (older RAK interface boards were set for PIN 17, you can try that if needed):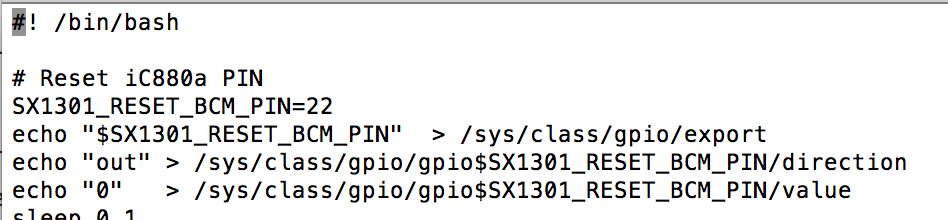
13) More information can be found online, here’s yet another good tutorial that you should see.
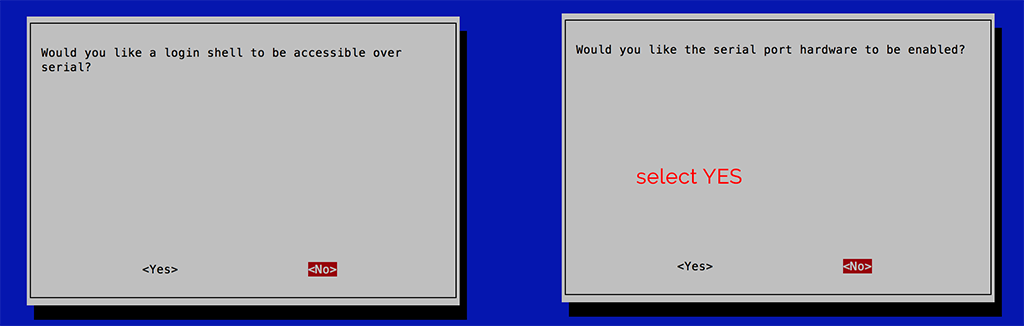
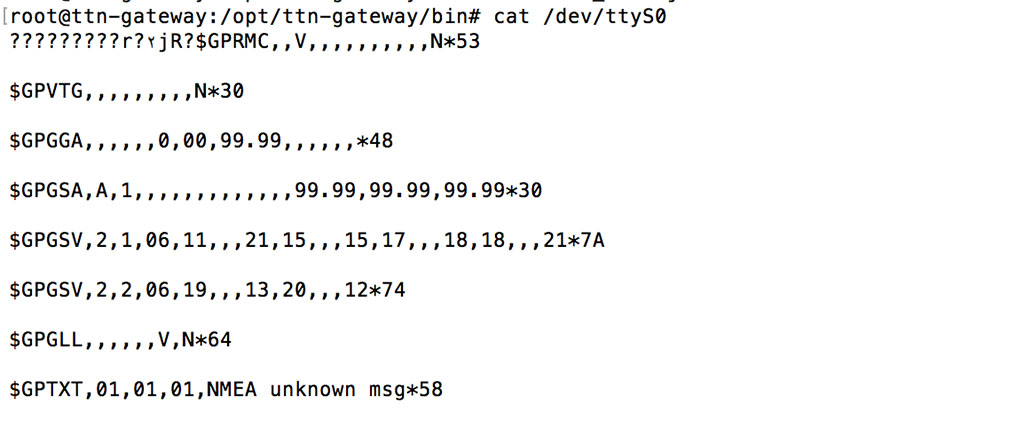
14) My RAK831 came with an adapter board hosting a GPS module. To enable it, go to raspi-config , (5) Interface Options -> P6 Serial and enable serial (no need to enable login via serial)
Now you can read GPS data in NMEA format right from the serial port:
Add the following to your local_conf.json :
"gps_tty_path": "/dev/ttyS0",

"gps":true,

"fake_gps": false
Now the log shows
INFO: GPS is enabled
INFO: Using real GPS if available.
INFO: [main] TTY port /dev/ttyS0 open for GPS synchronization
### [GPS] ###
# Valid gps time reference (age: 3 sec)
# System GPS coordinates: latitude xx.68237, longitude xx.47559, altitude 141 m
##### END #####
If you need to debug or see the logs, use one of the following:
systemctl status ttn-gateway.service
or
sudo tail -f /var/log/syslog
The results were immediate, and the packages started pouring:

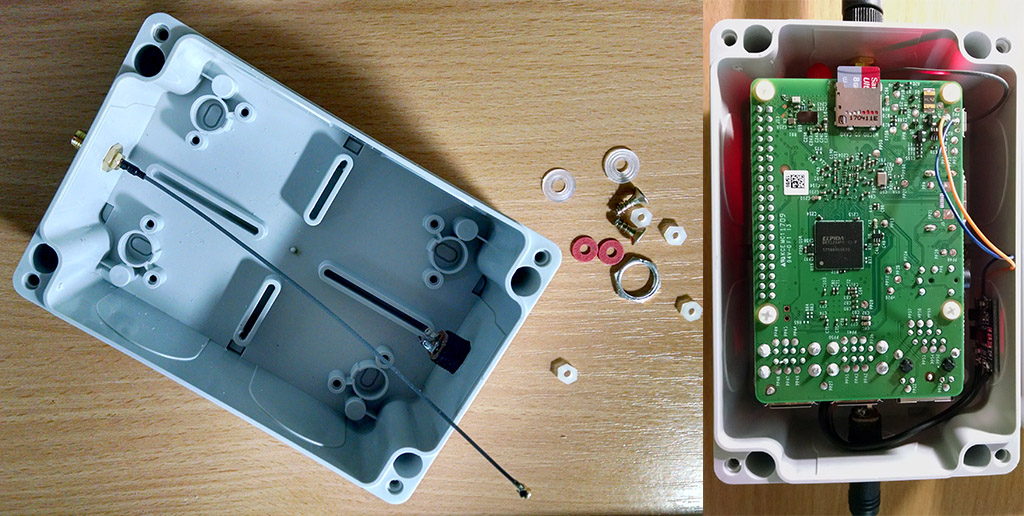
Building an enclosure
Since the PCBs were exposed and the construction somewhat vulnerable, I searched for an IP66 rated plastic enclosure, of the type used for electrical junctions to host the gateway. I also added an antenna extension cable with SMA connector, a DC-DC convertor so the gateway could be powered by a wider voltage interval (6V to 28V for this module) and put everything together:
All in one, this proved to be an excellent solution to a low cost, medium performance, multichannel gateway, that with the right components, takes only a few minutes to get running.
More options
The Raspberry PI3 can do a lot more while forwarding your LoRa packets. For instance, you can have it run a webserver at the same time.
sudo apt-get update
Next install apache2:
sudo apt-get install apache2 -y
When done, you can open your gateway’s LAN IP in your computer’s browser. To find out the IP, either check your router’s DHCP list or use the following command via SSH on the gateway:
hostname -I
Apache serves the content from the following location:
/var/www/html/index.html
Additionally, you can install PHP too:
sudo apt-get install php libapache2-mod-php -y
Instead of the index.html file you can create a index.php file that will be parsed instead. Job done.