
A lot has changed in the tools used to develop for Android since my last article on this topic. The previous article, back in 2009 has shown a basic guide to get you going. Here’s an update.
I will show what you need to develop on a Windows box, but it’s almost the same on the other platforms supported. Follow these steps:
Step 1. Download Eclipse, from here . Currently Eclipse Helios (3.6.1) is available (~200MB). While you’re on their website, consider donating to support this great tool.
Step 2. The download comes as a zip file. Install it to a location on your computer. I usually choose C:\Eclipse
Step 3.Download Google Android SDK, from here. Revision 9 is available at the this moment. The download comes as a zip file (android-sdk_r09-windows.zip) that you should unpack to a location on your PC. I choose the folder with my work projects: D:\work_code\android\android-sdk-windows\ . Be careful that this location should only contain common characters (do not use characters like &, $, etc).
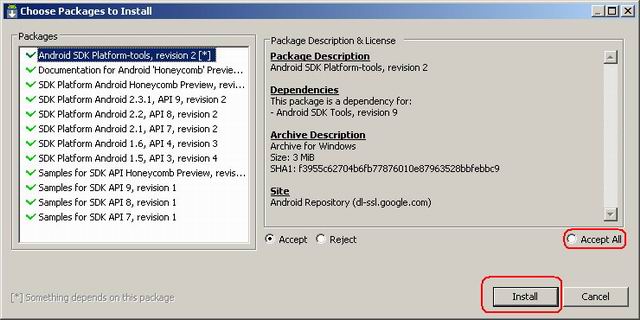
Step 4.Start SDK Manager.exe and go to Installed packages. Click accept all and install.

The components will download and install automatically. This will take some time so be patient.
Step 5.Go to the Eclipse folder, and start eclipse.exe. The very first time you will have to the workspace location, I simply choose the work projects location: D:\work_code\android . You should tick the “Use this as default” checkbox:

Pressing OK, starts Eclipse for the first time:
 |
 |
Step 6.In Eclipse, go to Help->Install New Software:
 |
 |
Press the Add button. In the dialog, enter ADT Plugin for Name, and https://dl-ssl.google.com/android/eclipse/ for the Location:

Press OK. When the content is displayed, select all the Entries, and press Next.

Press Next again, and select “I accept the terms of license agreements”:

Press Finish to complete this step. A dialog showing “Installing Software” appears. Wait for it to complete.
If you get a security warning, press OK to continue installation:

When prompt to restart Eclipse, choose “Restart Now”.
Step 7.As Eclipse restart, go to Window->Android SDK and AVD Manager

Press OK on the dialog “Location of the Android SDK has not been setup in the preferences”. We are about to do just that. Go to Window->Preferences, select Android in the left column, and browse for the SDK location (in my case it’s D:\work_code\android\android-sdk-windows ) .Press Apply. Press OK.

Step 8.Make sure you have Java JDK installed. You can get it here .
Step 9.You are ready to start your first Android Project. In Eclipse, go to File->New->Project, and select Android->Android Project. Alternatively you can go to File->Import to import existing Android code into Eclipse.
Step 10. Have fun coding. While working in Eclipse, make sure you enable the additional Android Views that will help you: Window->Show View->Other ->Android. There select what you need: Devices, File Explorer, but most important LogCat for the debug output.

Some additional resources:
http://www.pocketmagic.net/?p=665
http://developer.android.com/sdk/installing.html
http://www.pocketmagic.net/?p=1332
Hope this helps!
Pingback: PocketMagic » Developing for Google Android – the SDK
Hmm, ik krijg een javascript probleem op de site, nog meer mensen hier last van? Verder wel leuke blog ben hier gekomen via Google, ga zo door! groetjes