
 |
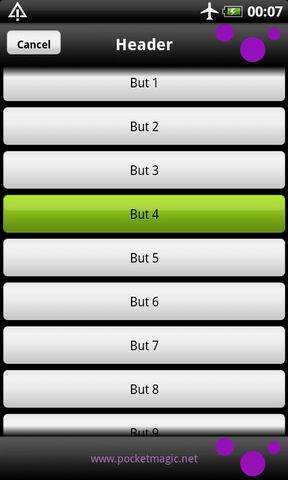
It happens quite often that we need to implement a custom interface, with a header and a footer, but in between the content is to big to fit the screen and then we need scrolling. On Android this can be implemented in an elegant fashion, by using the RelativeLayout control. We create the Header, the Footer and then a layout for the middle content that we set to be RelativeLayout.ABOVE the footer and RelativeLayout.BELOW the Header. That’s it! Sample source code: HeaderContentFooterGUI Note: To learn how to add a background, scroll to the bottom of this article. |
The relevant part of code:
//Create our top content holder
RelativeLayout global_panel = new RelativeLayout (this);
global_panel.setLayoutParams(new LayoutParams(LayoutParams.FILL_PARENT, LayoutParams.FILL_PARENT));
global_panel.setGravity(Gravity.FILL);

// +++++++++++++ TOP COMPONENT: the header
RelativeLayout ibMenu = new RelativeLayout(this);
ibMenu.setId(idTopLayout);
ibMenu.setBackgroundDrawable(getResources().getDrawable(R.drawable.line));
int ibMenuPadding = (int) 6;
ibMenu.setPadding(ibMenuPadding,ibMenuPadding,ibMenuPadding,ibMenuPadding);
RelativeLayout.LayoutParams topParams = new RelativeLayout.LayoutParams(LayoutParams.FILL_PARENT, LayoutParams.WRAP_CONTENT);
topParams.addRule(RelativeLayout.ALIGN_PARENT_TOP);
global_panel.addView(ibMenu,topParams);
// textview in ibMenu : card holder
TextView cTV = new TextView(this);
cTV.setText("Header");
cTV.setTextColor(Color.rgb(255,255,255));
int nTextH =  18;
cTV.setTextSize(nTextH);
cTV.setTypeface(Typeface.create("arial", Typeface.BOLD));
RelativeLayout.LayoutParams lpcTV = new RelativeLayout.LayoutParams(LayoutParams.WRAP_CONTENT, LayoutParams.WRAP_CONTENT);
lpcTV.addRule(RelativeLayout.CENTER_IN_PARENT);
ibMenu.addView(cTV, lpcTV);
// cancel button in ibMenu
Button m_bCancel = new Button(this);
m_bCancel.setId(idBack);
m_bCancel.setOnClickListener((OnClickListener) this);
m_bCancel.setText("Cancel");
nTextH =  12;
m_bCancel.setTextSize(nTextH);
m_bCancel.setTypeface(Typeface.create("arial", Typeface.BOLD));
RelativeLayout.LayoutParams lpbCancel =
	new RelativeLayout.LayoutParams(100,50);//LayoutParams.WRAP_CONTENT, LayoutParams.WRAP_CONTENT);
lpbCancel.addRule(RelativeLayout.ALIGN_PARENT_LEFT);
lpbCancel.addRule(RelativeLayout.CENTER_VERTICAL);
ibMenu.addView(m_bCancel, lpbCancel);

// +++++++++++++ BOTTOM COMPONENT: the footer
RelativeLayout ibMenuBot = new RelativeLayout(this);
ibMenuBot.setId(idBotLayout);
ibMenuBot.setBackgroundDrawable(getResources().getDrawable(R.drawable.line));
ibMenuBot.setPadding(ibMenuPadding,ibMenuPadding,ibMenuPadding,ibMenuPadding);
RelativeLayout.LayoutParams botParams = new RelativeLayout.LayoutParams(LayoutParams.FILL_PARENT, LayoutParams.WRAP_CONTENT);
botParams.addRule(RelativeLayout.ALIGN_PARENT_BOTTOM);
global_panel.addView(ibMenuBot,botParams);
// textview in ibMenu : card holder
TextView cTVBot = new TextView(this);
cTVBot.setText("www.pocketmagic.net");
cTVBot.setTextColor(Color.rgb(179,116,197));
cTVBot.setTextSize(nTextH);
cTVBot.setTypeface(Typeface.create("arial", Typeface.NORMAL));
RelativeLayout.LayoutParams lpcTVBot = new RelativeLayout.LayoutParams(LayoutParams.WRAP_CONTENT, LayoutParams.WRAP_CONTENT);
lpcTVBot.addRule(RelativeLayout.CENTER_IN_PARENT);
ibMenuBot.addView(cTVBot, lpcTVBot);

// +++++++++++++ MIDDLE COMPONENT: all our GUI content
LinearLayout midLayout = new LinearLayout (this);
midLayout.setLayoutParams(new LayoutParams(LayoutParams.FILL_PARENT,LayoutParams.FILL_PARENT));
midLayout.setOrientation(LinearLayout.VERTICAL);
RelativeLayout.LayoutParams midParams = new RelativeLayout.LayoutParams(LayoutParams.FILL_PARENT, LayoutParams.FILL_PARENT);
midParams.addRule(RelativeLayout.ABOVE,ibMenuBot.getId());
midParams.addRule(RelativeLayout.BELOW,ibMenu.getId());
global_panel.addView(midLayout,midParams );
//scroll - so our content will be scrollable between the header and the footer
ScrollView vscroll = new ScrollView(this);
vscroll.setFillViewport(false);
midLayout.addView(vscroll);
//panel in scroll: add all controls/ objects to this layout
LinearLayout m_panel = new LinearLayout (this);
m_panel.setLayoutParams(new LayoutParams(LayoutParams.FILL_PARENT,LayoutParams.WRAP_CONTENT));
m_panel.setOrientation(LinearLayout.VERTICAL);
vscroll.addView(m_panel);

Button b[] = new Button[10];
for (int i=0;i<10;i++) {
	b[i] = new Button(this);
	b[i].setLayoutParams(new LayoutParams(LayoutParams.FILL_PARENT, LayoutParams.WRAP_CONTENT));
	b[i].setText("But "+i);
	m_panel.addView(b[i]);
}
 |
Adding a backgroundYou can set a background for the middle content region. The background will be fixed, eg. when scrolling the middle content, it will float over it (so you only need a background image of the size of the screen: back.png) All you need is a single line of code:
global_panel.setBackgroundDrawable(getResources().getDrawable( R.drawable.back));
Complete source: |


Pingback: Android WebBrowser using WebView « PocketMagic
hi. do you have an xml version of the layout? thank you
hi chitgoks, no – I don’t use xml anymore.
Why u dont want to use xml????
@Daler, because for complex applications you need more freedom.
@Radu Motisan, freedom?? What about the speed?? will it affect to the speed of an app?
I didn’t notice any speed issues.
how to add list view instead of buttons..
Please help me….How to add below List View instead buttons..
ListView maListViewPerso = (ListView) findViewById();
ArrayList<HashMap> listItem = new ArrayList<HashMap>();
HashMap map;
map = new HashMap();
map.put(“titre”, “Movie Ticket”);
map.put(“description”, “Movie Ticket Booking”);
map.put(“img”, String.valueOf(R.drawable.reel_icon));
listItem.add(map);
map = new HashMap();
map.put(“titre”, “Snow World”);
map.put(“description”, “SnowWorld Tickets”);
map.put(“img”, String.valueOf(R.drawable.reel_icon));
listItem.add(map);
map = new HashMap();
map.put(“titre”, “Kissing Car”);
map.put(“description”, “Kissing Car Tickets”);
map.put(“img”, String.valueOf(R.drawable.reel_icon));
listItem.add(map);
map = new HashMap();
map.put(“titre”, “Events”);
map.put(“description”, “Events in Mall”);
map.put(“img”, String.valueOf(R.drawable.reel_icon));
listItem.add(map);
map = new HashMap();
map.put(“titre”, “Screens”);
map.put(“description”, “Screens @ Abirami”);
map.put(“img”, String.valueOf(R.drawable.reel_icon));
listItem.add(map);
SimpleAdapter mSchedule = new SimpleAdapter (this.getBaseContext(), listItem, R.layout.main_menu_list,
new String[] {“img”, “titre”, “description”}, new int[] {R.id.img, R.id.titre, R.id.description});
maListViewPerso.setAdapter(mSchedule);
I love your code and I hope you still read these messages. I prefer to do everything in code as well, which brings me to my question. I have just started using ExpandableListView and I cannot find any information on how to initialize and use it in code only. Do you know how? Let me be a bit more precise. I can use it all in code after I have used getExpandableListView() to attach itself to the xml file, but I do not want to use any xml.
Hi Patrick,
I would start with ExpandableListView list = new ExpandableListView ();
I tried that and it errors soon as setContentView() is used. (cannot find source)
Unfortunately I am not familiar with the ExpandableListView , but feel free to post your code, maybe I can have a look at it.
I solved it! If you use:
MyActivity extends ExpandableListActivity {……
You must use ExpandableListView ev = getExpandableListView();
which well look for your xml file to get your ExpandableListView id which must be setup like this: android:id=”@android:id/list” notice that the “@+id/….” is missing so you can not use findViewByID().
If you using:
MyActivity extends Activity {…..
then you can use:
ExpandableListView list = new ExpandableListView ();
and everything should be fine.
I have used your basic layout of the header and footer with scrollable middle content to create an app, however I am noticing that when I scroll to the bottom there is, what looks like a spinning clock. A single clock arm that spins around about once a second. I remember reading about someone else having the same issue and they solved the problem, but did not think much of it because I was not having the problem. However, now I am and I cannot find the article. I cannot figure out what is causing this, can you help please?
@Patrick can you include a screen shot? Or at least some hand drawn schematic? I’m not sure I understand what you are referring to.
Go to the app store and search for “AVON”. My app is titled “Order and Contacts” with my name beneath it. On the first screen if you scroll all the way down, the list well disappear, you well see the the spinning “clock arm”. It only appears on the first screen. My real issue is that the app well force close at times, or if you close the app and go back in, it well force close. I am trying to figure out why! Once you start the app it well begin to download the product information in the background. Nothing indicates when its done so please allow up to 15 minutes for it to complete before shuting down the app. It does this once every two weeks when a new campaign starts. On my phone I get the force close screen but the app keeps running just fine, however other people are reporting that they are getting booted out of the app completely. Please let me know what you think.