
(Update Jan 2011 a new Listview article is available. It shows how to create a Header on top of all items.)
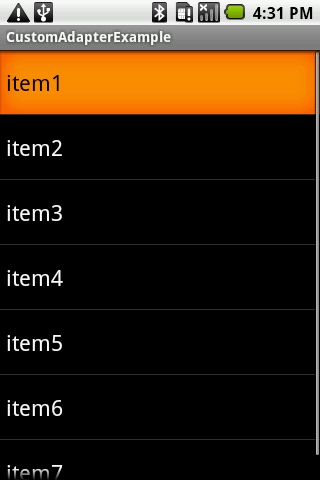
The standard controls in Android API are good, they do a decent job and are very configurable. For eg. the standard listview allows a collection of items, provides custom colors, and nice actions like the finger friendly scroll:

|
 |
The left picture is a simple listview. The right image shows what we are planning to do in this tutorial.
Simple listview sample code here.
For various purposes, we might want to enrich the look and feel of a listview, to add pictures or other controls, or to better organize the items. There are a few samples available on the Internet, but they all require a static definition of an item, using the row.xml resource. I’m showing a different approach: build the items using only Java code, this is what is called a Dynamic Listview custom adapter, so no XMLs required here.
The idea is to use the standard Listview control, but build a different adapter to define the items.
First, let’s focus on the items. Let’s say we want each item to contain data regarding a network adapter. This means we’ll record the name, the address , a type (maybe for wired/ wireless) . To define these details a new class is needed: Device.java
public class Device {

	    private String m_szDeviceName;
	    private String m_szDeviceAddress;
	    private int m_nDeviceType;
	    private int m_nDeviceStatus;
	    private int m_nDeviceID;

	    public Device( String deviceName, String deviceAddress, int deviceType, int deviceStatus, int deviceID ) {
	        this.m_szDeviceName = deviceName;
	        this.m_szDeviceAddress = deviceAddress;
	        this.m_nDeviceType = deviceType;
	        this.m_nDeviceStatus = deviceStatus;
	        this.m_nDeviceID = deviceID;
	      }


	    public String getDeviceName() { return m_szDeviceName; }
	    public void setDeviceName(String deviceName) { this.m_szDeviceName = deviceName;}

	    public String getDeviceAddress() {return m_szDeviceAddress;}
	    public void setDeviceAddress(String deviceAddress) {this.m_szDeviceAddress = deviceAddress;}

	    public int getDeviceType() { return m_nDeviceType; }
	    public void setDeviceType(int deviceType) { this.m_nDeviceType = deviceType;}

	    public int getDeviceStatus() { return m_nDeviceStatus; }
	    public void setDeviceStatus(int deviceStatus) { this.m_nDeviceStatus = deviceStatus;}

	    public int getDeviceID() { return m_nDeviceID; }
	    public void setDeviceID(int deviceID) { this.m_nDeviceID = deviceID;}
}
While Device.java defines the DATA for each listview item, we need another class to define the View of each item, meaning that we need to construct the items using standard interface components (imageviews, textviews, etc). For this, we’ll be using another class, CustomAdapterView:
class CustomAdapterView extends LinearLayout {
	public CustomAdapterView(Context context, Device device)
	{
		super( context );
		/*setOnClickListener((OnClickListener) context);
		setClickable(true);
		setFocusable(false);*/
		setId(device.getDeviceID());

		//container is a horizontal layer
		setOrientation(LinearLayout.HORIZONTAL);
		setPadding(0, 6, 0, 6);

		//image:params
		LinearLayout.LayoutParams Params = new LinearLayout.LayoutParams(LayoutParams.WRAP_CONTENT, LayoutParams.WRAP_CONTENT);
		Params.setMargins(6, 0, 6, 0);
		//image:itself
		ImageView ivLogo = new ImageView(context);
		// load image
		if (device.getDeviceType() == 0)
			ivLogo.setImageDrawable(context.getResources().getDrawable(R.drawable.logo1));
		else if (device.getDeviceType() == 1)
			ivLogo.setImageDrawable(context.getResources().getDrawable(R.drawable.logo2));
		//image:add
		addView(ivLogo, Params);

		//vertical layer for text
		Params = new LinearLayout.LayoutParams(LayoutParams.FILL_PARENT, LayoutParams.WRAP_CONTENT);
		LinearLayout PanelV = new LinearLayout(context);
		PanelV.setOrientation(LinearLayout.VERTICAL);
		PanelV.setGravity(Gravity.BOTTOM);

		TextView textName = new TextView( context );
		textName.setTextSize(16);
		textName.setTypeface(Typeface.DEFAULT, Typeface.BOLD);
		textName.setText( device.getDeviceName());
		PanelV.addView(textName);

		TextView textAddress = new TextView( context );
		textAddress.setTextSize(16);
		textAddress.setText( device.getDeviceAddress());
		PanelV.addView(textAddress);

		addView(PanelV, Params);
	}
}
As you can see, this class builds a nice item made out of an imageview, and two lines of text:

Now we only need to build the Custom Adapter class, that will use the CustomAdapterView private class and implement the getView method:
public class CustomAdapter extends BaseAdapter /*implements OnClickListener*/ {

	/*private class OnItemClickListener implements OnClickListener{
	    private int mPosition;
	    OnItemClickListener(int position){
	            mPosition = position;
	    }
	    public void onClick(View arg0) {
	            Log.v("ddd", "onItemClick at position" + mPosition);
	    }
	}*/

	public static final String LOG_TAG = "BI::CA";
    private Context context;
    private List deviceList;

    public CustomAdapter(Context context, List deviceList ) {
        this.context = context;
        this.deviceList = deviceList;
    }

    public int getCount() {
        return deviceList.size();
    }

    public Object getItem(int position) {
        return deviceList.get(position);
    }

    public long getItemId(int position) {
        return position;
    }

    public View getView(int position, View convertView, ViewGroup parent)
    {
        Device device = deviceList.get(position);
        View v = new CustomAdapterView(this.context, device );

        //v.setBackgroundColor((position % 2) == 1 ? Color.rgb(50,50,50) : Color.BLACK);

        /*v.setOnClickListener(new OnItemClickListener(position));*/
        return v;
    }

    /*public void onClick(View v) {
            Log.v(LOG_TAG, "Row button clicked");
    }*/

}
Using these resources it is trivial to build and use a listview. This code in our main example class:
ListView ls2 = new ListView(context);
// clear previous results in the LV
ls2.setAdapter(null);
// populate
ArrayList m_Devices = new ArrayList();
Device device;
for (int i=0;i<10;i++) {
   device = new Device("Network Device "+i,"13:B4:5C:0D:AE:67", i%2,0, 100 + i);
   m_Devices.add(device);
}
CustomAdapter lvAdapter =  new CustomAdapter(context, m_Devices);
ls2.setAdapter(lvAdapter);
Creates a simple but nice Listview:
Get click event on Custom Adapter Listview
Ok, there are a few ways of handling this.
Method 1
In CustomAdapterView constructor, you make each item clickable, set an id (that you can use later to identify the item), and set a click listener (in the main class, using the context):
public CustomAdapterView(Context context, Device device)
	{
		super( context );
		setOnClickListener((OnClickListener) context);
		setClickable(true);
		setFocusable(false);
		setId(device.getDeviceID());
		...
Then in the main example class you catch the click event:
public void onClick(View v) {
	int cmdId = v.getId();
	if (cmdId >= 100) { //first listview id
		int nIndex = cmdId - idLV1FirstItem;
		Log.i(LOG_TAG, "LV2 click "+nIndex );
		}
	}
This method works good, but it has a major disadvantage: because you've used "setClickable", the items will not show any change when clicked: they won't be drawn as "clicked". But you receive the click event.
Another disadvantage is that the listview will not react to key presses (enter) on items.
Method 2
The correct way of doing this, is to use the setOnItemClickListener method, without setClickable.
        ...
        ls2.setAdapter(lvAdapter);
        ls2.setOnItemClickListener(new OnItemClickListener()
        {
        	public void onItemClick(AdapterView arg0, View arg1,int arg2, long arg3)
        	{
        		Toast.makeText(getBaseContext(), "You clicked on "+arg2, Toast.LENGTH_LONG).show();
    		}
    	});
        ...
This way you have the animation when an item is clicked, and you also get the click event. And it works with key presses as well. All in one, this is the method to use for getting click events on custom adapter listviews.
Change row colors
You can have one row of a color, and the next in another color to read the content easier.
In CustomAdapter, method getView, simply use v.setBackgroundColor based on position:
v.setBackgroundColor((position % 2) == 1 ? Color.GRAY : Color.BLACK);
The result looks like this:

Here is the code for this tutorial:
Custom Adapter Listview Source code, 57KB
See how to create a Header complex Listview here.
Hope this helps,
thanks..
very helpful….
Great tutorial, love how you have listed everything out step-by-step with detailed explanations. It’s just awesome, thank you for sharing!
Hello Radu,
Nice, simple and to the point…
Very good explanation.
Thanks.
Thank you
Muchas gracias, en verdad es un excelente tutorial. saludos desde Colombia.
glad it helped.
thnx for article 🙂
but what are the changes when list item has an xml layout?
Thanks for helpful tutorial, but still have one question.
Can anyone explain with code example – how in this example i could get onItemClick – row/element ID from database?
I made query which build arrayList in same way except last value:
device = new Device(“Network Device “+i,”13:B4:5C:0D:AE:67”, i%2,0, id_from_db );
How to retrieve this id_from_db when the row of element will be clicked?
The ID is used for the OnClick event, see Method 1 and Method 2.
It doesn’t have anything to do with your Database.
But, since you’ve asked, you can assign the database row number or the database index to each items. When the user clicks it, you get the id, so you can extract further info from your DB.
Thanks, and sorry for stupid question – everything works.
Thanks a ton for such a nice tutorial , it really helped me……
Thanks, I’m glad it helped.
nice tutorial.. very help me..
hell dear ,
i have some problem in android,
sir, i have 1 list view ,it’s contain losts of item,
sir how got 10 item in the list view at same time ,i put button then click on button then got next 10 item ,then click next continue,,,,,,,,
how it’s possible sir,
Thanks & Regards,
Girish Patel
hell dear ,
i have some problem in android,
sir, i have 1 list view ,it’s contain losts of item,
sir how got 10 item in the list view at same time ,i put button then click on button then got next 10 item ,then click next continue,,,,,,,,
how it’s possible sir,Reply me
Thanks & Regards,
Girish Patel
Yes Girish, it’s possible.
First you populate the adapter with the first 10 items. Then when you press next, you create a new adapter with the next 10 items, and you set it to your listview.
The items will change accordingly.
Thanks a lot for sharing this, it helped me very much! I only have the problem that, after commenting in your code to change the background color of the item views, the animation when the item is clicked is no more there. Without setting a background color, the animation is visibe.
Since I only need one (dynamically set) background color, I also tried ls2.setBackgroundColor(..), but then the background color disappears for the time the list is scrolling.
Any help would be much appreciated.
The following seems to work:
I commented out the line
//v.setBackgroundColor((position % 2) == 1 ? Color.rgb(50,50,50) : Color.BLACK);
Instead, I used:
ls2.setBackgroundColor(bgColor);
ls2.setCacheColorHint(bgColor);
Information about the CacheColorHint can be found here:
http://developer.android.com/resources/articles/listview-backgrounds.html
This works well for opaque lists with only one background color and my problem is thereby solved “somehow”.
Anyway it would be interesting if there is a way to make the onClick-animation work also on lists items with more then one background color, like those shown in your code.
Thanks again for the useful tutorial!
Greetings, katze
katze wrote:
“after commenting in your code to change the background color of the item views, the animation when the item is clicked is no more there”
Did you try this with Method 1 or Method 2 for detecting clicks?
If the 2nd method is used (like in the download archive you provide), the text color turns darker as long as the user clicks the item. The background color doesn´t change to orange (as it does if the v.setBackgroundColor line is commented out).
If a context menu is used (registerForContextMenu(ls2);), there also is no color-fade-in if the v.setBackgroundColor line is used. Normally the item background would fade to white to show the user that a longClick is “on its way”.
If the textcolor of the item is changed like this
…
textName.setText( device.getDeviceName());
textName.setTextColor(0xFF0000FF);
PanelV.addView(textName);
…
then the TextView doesnt even “turn darker” as mentioned above, it simply doesn´t change anymore.
It seems as that every assignation of background or text colors do override the normal behavior of the listview.
thanks it helped me alot.
hi, Vinodkumar, I’m glad this proved useful.
Great tutorial!!
Helps a lot ..
Glad to hear that. See the updated article as well.
thanx for this tutorial
please give me answer how to get this custom listview filed….for example in this example i want to get “Network Device 2″,”Network Device 3”
Hi saurabh, I don’t quite understand your question?
find here an example : http://android-apps-blog.blogspot.com/2011/04/how-to-create-listview-with-custom.html
Thank you!
You have done a beautiful job of explaining every step.
Looking forward to reading the updated article..
Thanks man. This is exactly what I was trying to accomplish. Great article.
Glad it helped, thx for the feedback!
Thanks a lot. It helped me a lot. Question is, how can i make the same one using row.xml. I tried to but it crashes and i cant find what’s wrong. So what do we need to change to get the custom view from an existing xml?
can you post your logcat output?
Hi,
Nice Tutorial, just a quick question though. What was the objective behing extending the LinearLayout in stead of the BasaAdapter class as most of the other tutorials on Custom Adapters usually do? Thanks
Best Regards
D Sriram
My bad please ignore my previous question, I see that you have just extended the linerLayout using the CustomAdapterView class instead of the CustomAdapter class. Sorry .
can u suggest me what wrong i m doing…i use ur code,,but nothing get displayed in my screen..after adding listview iadded a tost..it get visible but not listview…plz suggest me something..
Awesome Really Appreciate your work but Sir I want to know Can we generate Button Dynamically after item is clicked in list view and Is it possible how can I do it.
Hello,
In my case I want to run the main.xml, then when Login start a new Activity that invokes the ListView and create it, how can I do that?
Willy you can start a new activity using an intent. Just define the new activity in it’s own class.
Hi!
First off GREAT TUTORIAL!
Second: I want to make the list auto-expandable.
I have tried for 8 straight hours to add items to the list without reloading it.
So far I have made a few bad solutions that I’m not happy with.
I have tried to add views to the listview, set a new adapter with more results, set a new adapter.
Everything just fails. Can you please help me? This is driving me crazy, for real, I just can’t give up.
Thanks!
If you don’t get what i mean, please email me for further discussion.
Excellent tutorial, thank you!
For some reason I needed to change this
ivLogo.setImageDrawable(context.getResources().getDrawable(R.drawable.logo1));
into this
ivLogo.setImageResource(R.drawable.logo1);
or otherwise I would get ResourceNotFound exception
Am Really thankful to you dude……………….
thank u very much for giving code
My pleasure, glad it helped!
After going around dozens of tutorials in circles, this clear explanation and example solved all my ListView woes. Thank you very very much.
I’m glad it helped.
Thanks for putting this up, I can finally display a list from a JSONArray following your tutorial!
There’s still one problem however, for some reason my list is not scrollable… The scroll bar is there but I just couldn’t scroll it… Would you happen to know why?
Thanks in advance
Nevermind my previous problem, found out I can’t have a scrollview outside the listview…
Cheers!
that’s great , but better post more details: others might find it useful! after all we are here to help.
well, I thought I needed a ScrollView for the list to scroll so I put the ListView inside a ScrollView. Turns out the ListView is designed to scroll automatically and does not work inside a ScrollView, so I removed the ScrollView and it worked.
Hello,
You did a great job.
Thank you so much it helped me a lot.
In fact, I tried to change TextView to Edittext because i’m working on android app and i need edittexts.
Your code still work perfectly but I lose focus when i click on edittext. I must click twice to change the content of any edittext.
Do you have any solution?
Thanks in advance
I changed TextView to EditText like this :
final EditText edittext= new EditText( context );
edittext.setTextSize(16);
edittext.setText( device.getDeviceAddress());
edittext.setInputType(InputType.TYPE_CLASS_NUMBER);
edittext.selectAll();
edittext.setSelectAllOnFocus(true);
PanelV.addView(edittext);
Really most helpfull tutorial I found in last 2-3 days
Thanks a lot dear
@Nandlal you’re welcome.
looking for that only i have to create Customize ListView from JSONData.
Thanks a lot i did it.
Nice!
it helped-me so much
But, you could tell me what is the need to use “setId(device.getDeviceID());”?
thank you!
peace!
It will be better if you explain how to use ViewHolder class with this?