For a few years now, most of my projects squeezed the juice out of the versatile AVR microcontrollers in colourful projects. It was a great experience starting with the first blinking led project, and culminating with an Earth scale distributed radiation surveillance network.
Thank you Atmel for offering these amazing tools!


Time has come to explore more. As I recently purchased a STM32F401 Nucleo board for little over $10, I decided to write an article detailing the steps involved in getting the first piece of code running on the Nucleo.
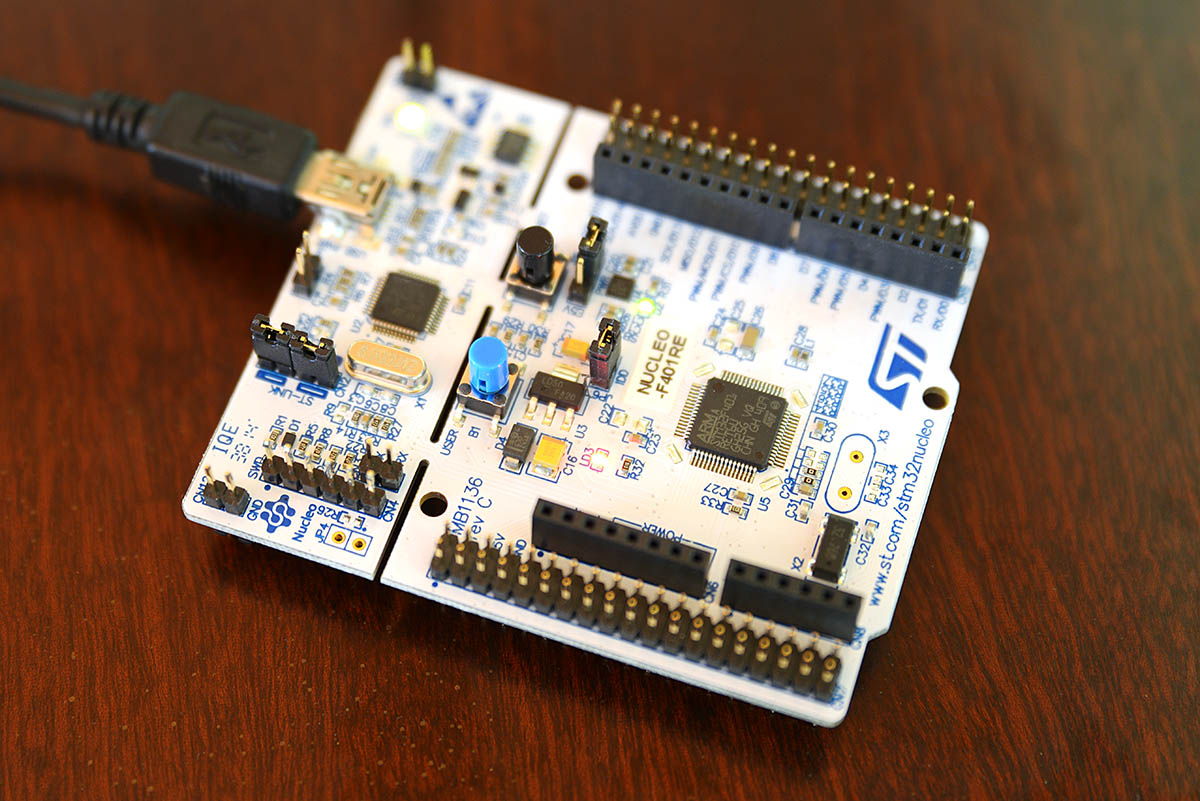
STM32 is a family of 32-bit microcontroller integrated circuits by STMicroelectronics. Datasheet is available here. The STM32 chips are grouped into related series that are based around the same 32-bit ARM processor core, in this case the Cortez-M4 running at 84MHz. The rest of the specs are appealing, including 512KB of Flash, 96KB of SRAM, lots of pins including general IO and specialised, while the debugger/programmer is already included, as an extension of the Nucleo board (the ST-LINK/V2-1). The board is also mbed enabled, allowing painless programming without a preinstalled toolchain (online IDE on developer.mbed.org)
IDE, compiler and programmer for MacOS
The online mbed platform is great, not only that it provides lots of libraries but also comes with the online IDE. It’s also multiplatform and you’ll only need a web browser to start coding. Personally I’m more interested in offline tools, and I like to have total control over my tools and more important, code. For that there are plenty of tools available for Windows. Let’s see what we can use for MacOS.
1. First we need OpenOCD (on chip debugger). To get it working on MacOS, one way is using MacPorts. This is a packet management system, similar to apt-get on linux. With MacPorts in place, use it to install openOCD:
sudo port install openocd
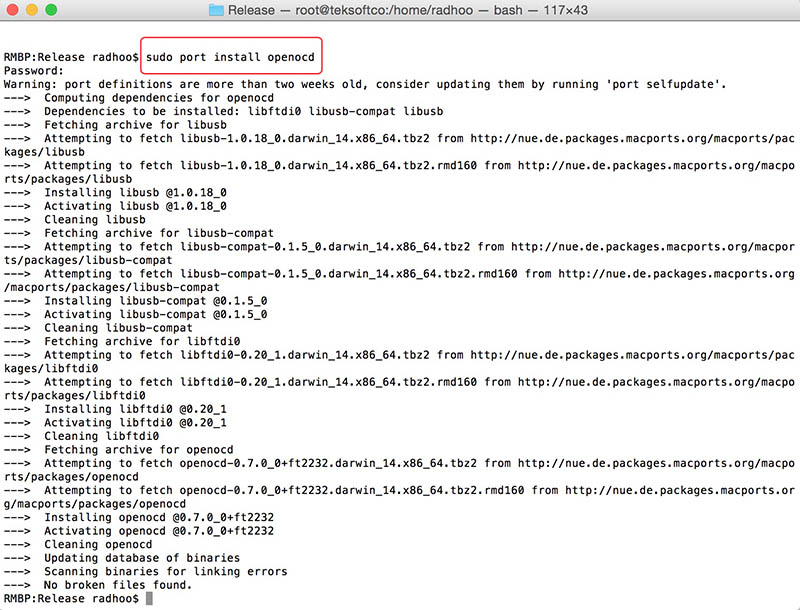
The files installed are deployed in the /opt/local/ directory and /opt/local/bin/openocd is the executable we’re interested in. The location /opt/local/share/openocd/ also contains a number of different scripts to configure OpenOCD for various programmers and microcontrollers. The dependencies also include libusb, libftdi which are drivers for the respective hardware interfaces.
Make sure you’re using latest MacPorts version (or use: sudo port selfupdate then: sudo port upgrade outdated) to also get the latest openOCD version .
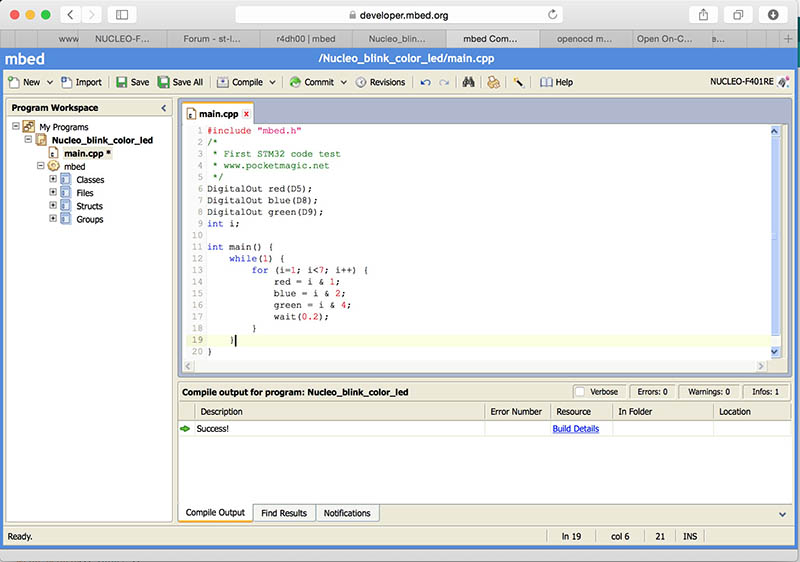
At this point we can already use the mbed online IDE to compile a test program, and we have all the tools in place to burn the .bin file to our microcontroller. Just for a quick test:
#include "mbed.h"

DigitalOut led(LED1);
DigitalIn button(USER_BUTTON);

int main() {
    float delay = 0.1;
    while(1) {
        led = 1 - led; // toggle led
        wait(delay);

        // if button is pressed, change delay
        if (button == 0) {
            wait(0.1); // wait a little to confirm button press
            if (button == 0) {
                // toggle between short and long delay
                if (delay < 1) delay = 1; else delay = 0.1;
            }
        }
    }
}
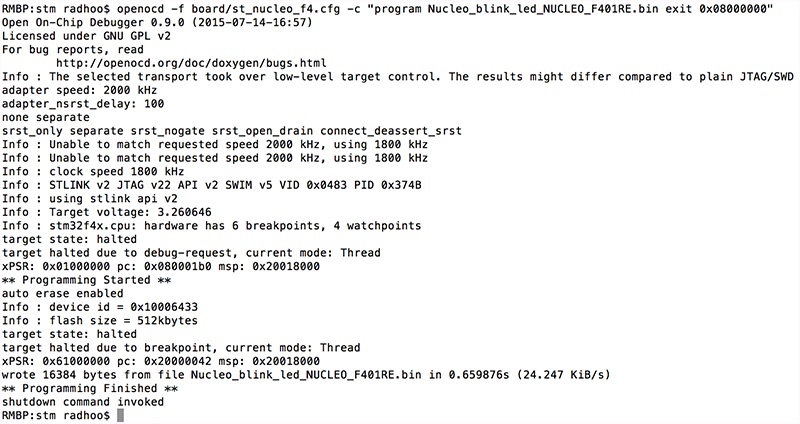
Pressing "Compile" button we get the result as a .bin file download. Open the terminal, go to the download folder. Then type:
openocd -f board/st_nucleo_f4.cfg -c "program file_name.bin exit 0x08000000"
Where file_name.bin must be replaced with the name of your .bin file. For other command line parameters, you can checkout the various .cfg files residing in the openocd installation folder (/opt/local/share/openocd/scripts/) . The result must confirm programming was successful:
And here a quick video showing the code execution on the Nucleo-F401 development board:
2. Now, let's continue with our offline setup. My IDE of choice is Eclipse. Get it here, and install it. You might also need Java Development Kit, available on the oracle website.
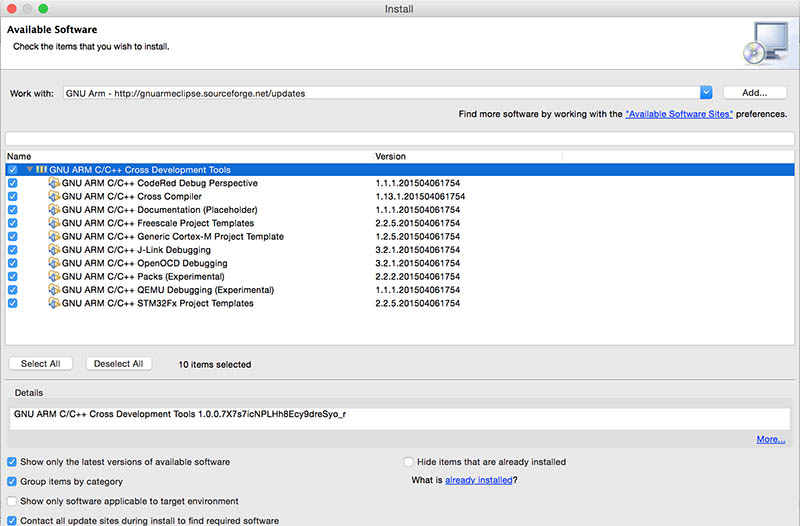
3. Install GNU Arm plugin for Eclipse. Open Eclipse, and go to Help->Install new software->Add, enter a name and the following url: http://gnuarmeclipse.sourceforge.net/updates . Select the results, then press Next / Accept / Finish to get it all installed. If you are getting dependency related errors, you might want to make sure your Eclipse is the latest version.
4. Download the toolchain, either Yagarto or (better) the GNU Tools for ARM Embedded Processors. Go for either 4.1 or 4.2 (preferred):
4.1 One option is to install Yagarto , which is Yet Another GNU ARM Toolchain. It is used by Eclipse to cross-compile the ARM code on the Mac and generate the binary file. You can get it here (file yagarto-bu-2.23.1_gcc-4.7.2-c-c++_nl-1.20.0_gdb-7.5.1_eabi_intelmac_20121222.dmg)
The package contains a readme file, with important notes - make sure you check that out first:

My location of choice was /Users/radhoo/Work/yagarto/yagarto-4.7.2 and the path append commands in the Terminal as follows:
export PATH="$PATH:$HOME/Work/yagarto/yagarto-4.7.2/bin"
export PATH="$PATH:$HOME/Work/yagarto/yagarto-4.7.2/tools"
Don't forget to test that the path is properly set using arm-none-eabi-gcc --version in the Terminal.
4.2 Preferred option is to go with the GNU Tools for ARM Embedded Processors. Get the MAC version from https://launchpad.net/gcc-arm-embedded/+download . Currently that is gcc-arm-none-eabi-4_9-2015q2-20150609-mac.tar.bz2 . Uncompress it to /usr/local using:
cd /usr/local
sudo tar xjf ~/Downloads/gcc-arm-none-eabi-4_9-2015q2-20150609-mac.tar.bz2
We now have the new /usr/local/gcc-arm-none-eabi-4_9-2015q2 folder with the toolchain files in place and we can test them with:
/usr/local/gcc-arm-none-eabi-4_9-2015q2/bin/arm-none-eabi-gcc --version
The result:

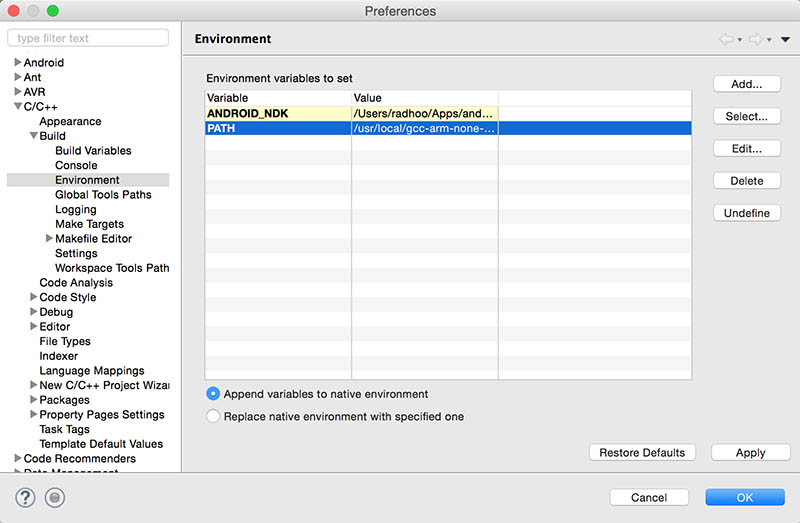
Go to Eclipse, and add the toolchain to the PATH variable. Eclipse->Preferences->C/C++->Build->Environment press Add and set variable name as PATH with value /usr/local/gcc-arm-none-eabi-4_9-2015q2/bin
5. Open Eclipse, go to New->Project->C Project , open Executables and select STM32F4xx C/C++ Project. Hooray, templates! That's a nice start!

More information on:
http://gnuarmeclipse.livius.net/blog/toolchain-path/
http://www.carminenoviello.com/en/2014/12/28/setting-gcceclipse-toolchain-stm32nucleo-part-1/
http://salvatoremenendez.blogspot.ro/2011/08/mac-os-eclipse-openocd-stm32-arm-cortex.html
http://grafixmafia.net/updated-using-the-stm32f4-discovery-board-with-mac-osx-10-9-mavericks/
You might also be interested in commercial solutions:
http://www.rowley.co.uk
This article has 3 Comments