

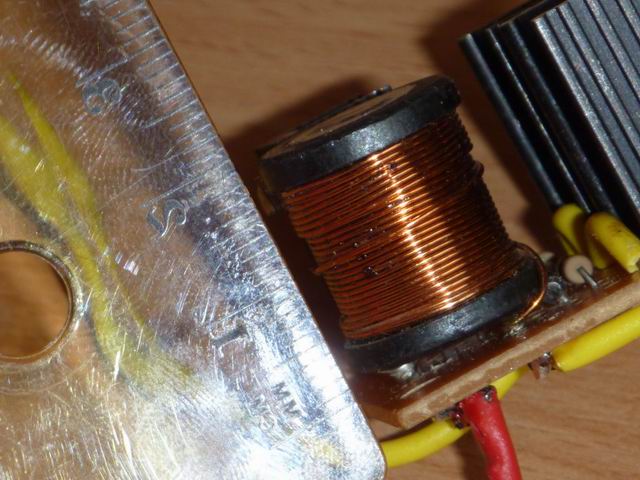
A Royer oscillator with 2 IRF540 N-Channel mosfets, a 0.47uF Capacitor and a 1500uH inductor used for a simple DIY induction heater. The mosfets remain cool, even with such small heatsinks. An isolation transformer was used for the first test with a work coil of 20turns, then the transformer was removed and a work coil of 7+7 turns connected directly to the oscillator.
Here are the schematics for the two variants:

Construction is easy: small heatsinks for the mosfets and 12V regulator, capacitor close to mosfets and coil, tick wire in the work coil. For any other questions, use the comments form below.
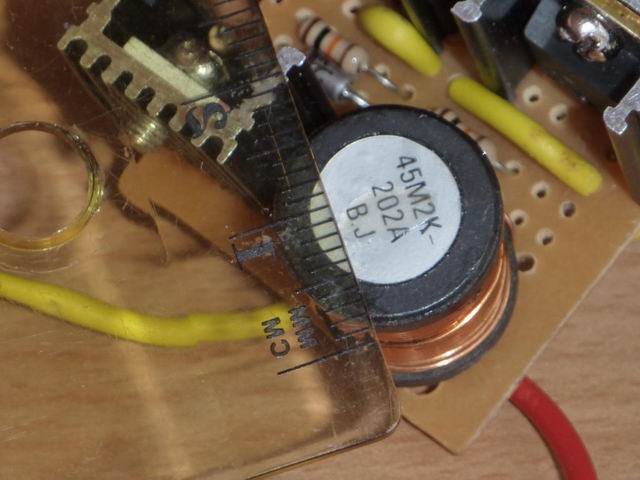
The 2000uH ferrite inductor closeups:

Very neat! Just what I have been looking for, can’t wait for the schematics and construction details. Good work!
Thanks for your interest , I almost forgot about it. Will try to upload the schematics today.
I am very intrested in this schematic. I hope I will make this project. If you have more bigger one with detial circuits please could you publish or mail me with schematic
Thank you very much
Sanu Nepali
Sanu, the circuit diagram is published already, see it above, under the video.
Dear Mr. Radu,
Thank you very much for prompt responding my post.
Just I would like to ask you about the Diod BYV26E. Can I use any another diod? such as 1N4007 etc? and what is inner dimeter of working coil?
Thank you very much for
Sanu
Thank you Radu. I’m looking foward to building this!
Sorry Radu, I too have a question about the diodes, there are two in the schematic that are unmarked the symbol is for zener types, what are they?
Thanks.
Hi Chris, they are regular 10V Zener diodes. I’ve used 0.5W ones.
Thanks again Radu, right that’s me set up, I think! Now let’s see what we can heat up :0)
Good luck, Chris, show me a few pics when you have it ready!
Dear Mr. Radu,
Two days before i wrote comment about the BYV26E doid on your schematic. Still I am waiting your post fot the diod. I could not find the fist avalanche dion in our country.
mostly what kind of circuit used this types of diod ?
Thank you
Sanu Nepali
Sorry Sanu, I missed that part.
Instead of BYV26E, you can NOT use the 1N4007 . You will need a fast diode instead. Look for the recovery time in the datasheet, it must be under 100nS.
Thank you Mr. Radu
very much for your prompt post. I am happy.
anyway I will try to make your project.
Ok Sanu, good luck with that. Where are you from?
Sorry Once more again I am writing here.
FR107 can be used instead of BYV26E?
This diod is fast recovery diod.But it is 500nS I think.
Thank you
Sanu
Nope, it’s not fast enough. Try to get 2 diodes under 100nS.
It’s a very simple, yet efficient circuit.
Thank you much for freely sharing with the community.
Mike
Thanks Mike, if you build it, feel free to send me photos with your setup – I can post them here.
Greetings,
You developed the 2000 uh choke inductor or is it a 1500 uh yourself? The one feeding +bias to the primary of the ferrite core transformer, some details on its construction please as I have a circuit quite close to yours, using nand gates to trigger mosfets instead. I am using 500 uh with the transformer-gates. Need to fit whole thing in my pocket.
Thanks,
Joaquin
The first variant used a 1500uH, but I’ve changed it to a 2000uH in later variants. You can purchase it from an electronics shop, the only requirement is tick wire to withstand the current: 0.6mm CuEm should do.
JOAQUIN , see the bottom of the article, I’ve added two more photos for you. The ruler is in centimeters.
Thank you so much Mr.Radu this is just awesome. just one more thing can i use irfp460’s i mean as far as it goes they have higher ratings and so i think i can put more volts like may be upto 40v and 6 amps??? BTW,so happy finally got it under my range.. 😉 thank you once again.
Hi Salar, I’m glad it works for you.
Be careful about the IRFP460’s, they do have higher ratings, but they also have bigger Rds , so they will heat up more.
For me the IRFP460 didn’t work very well, but if you can, try it and let me know.
Good luck!
hi Radu,
i’ve stumbled across your very nice looking induction heater and i tried to rebuild
it. unfortunately, i’m not really satisfied with its performance: when placing some
metal strip (e.g. the cover of a SCSI slot) into the coil it does get quite hot after
about 1 minute but stays far from glowing red even if heated for 5 or 10 minutes.
i’ve tried out various coils, caps and powerful MOSFETs, for instance: IRFP 90N20D
(200 V, 94 A, 23 mOhms, 580 W); IRF 3710 (100 V, 57 A, 23 mOhms, 200 W); IRFP 4368
(75 V, 195 A, 1.85 mOhms, 350 A). coil: 7+7 turns of 10 mm^2 litz wire, caps: 6 to
12 x 0.075 uF, 800 V, 2% in parallel.
for the fast diodes i’m using the suggested ones (BYV 26E).
i can see a nice sine wave (about 50-100 kHz) but there are some problems: the
oscillation only starts whe Uin rises obove something like 10 V (yours is running
fine already at 3 or 4 V). and when Uin increases beyond 20-25 V (Iin > 2 A) even
the most powerful MOSFETs get very hot. then i’ve to put Uin down because otherwise
the MOSFETs would be destroyed. any idea what could be the reason for this ?
i don’t have a big choke coil of 2000 uH, though, mine is only about 200 uH. but
this coil should only keep the RF away from the power supply, right ?
thanks for your help !
Herbert
I just started working in a foundry, and they use induction heating, so i am going to build a small ver…. i was wondering, what about a PWM? For the reason that it have curring limiting ability changing Freq, also the pulse… If one was do limit the amps at 20A feq at 50Hz and pulse about one sec a part would that work? i know that if you pulse the coil the magnetice field wil go high in the op. direction? will that not make a sin. wave sorry for bad spelling
Hi Mr. Radu,
I’ve just started to by the components for the induction heater. I was wondering BYV28-200 fast diodes (30ns, 200V) could replace the BYV26E? And how could I make a 2000uH coil on a toroid core at home( if it’s possible)?
Thank you
Feher Aron
Mr. Radu.. Sir my induction heater is working very well although the mosfets heat up mildly. my problem is that i cant get the work piece to glow red hot and my inductor gets hot really soon.. would it help if i use a couple of capacitors in parallel so as to make a capacitor tank like in other induction heaters.. and im not sure if my inductor is of 2000 uH but i’ve use an old radio ferrite core with many wounds of thin wire just a little bit thicker than the one in your inductor. by the way the inverter is working fine i am using 24 volts at about 6 amps… Help Help Help…
whay is the meaning 7+7 turns coil?
it means a 14 turns coil with a central tap.
Hey there Mr.Radu.. 🙂 I finally got my induction heater working awesome.. it can now turn a nail red hot in 33 seconds. I would like to share it with you sir.
Zvs Components:
IRFP250-N MOSFETS x 2
470 Ohm 5W resistors x 2
UF5480 x 2 fast diodes
Zenner diodes 15v 1W x 2
10k Ohm 1 w resistors x 2
Inductor:
I am not sure of the inductor value but i know that is quite large i took it out of my stereo speakers it is shaped like a bobin with many turns of copper wire, well for me about just any inductor works.
Capacitor:
i had four “250v 0.47uF MKP X2” capacitors i divide them in group 1 and group 2 such that each group contains two capacitors. =P
Now i took group 1 and connected the two caps of that group in series, i did the same with group 2 .. now i had two caps in total so i now connected these in parallel. and i used this capacitor bank for ZVS primary
The primary has 5+5 turns on a flyback core which i have used to isolate the inverter.. Here’s the deal i used 7 turns “thick red house wiring” on the secondary ad connected an 11 turn ” thick copper winding wire ” work coil and it was turning the nail just hot in about a minute then what i did is i connected another capacitor bank that has the following caps all 250 v ” 0.68uF MKP+ 2 uF x2 those glossy looking ones + 394j x 4 glossy small ones i think it means 390000 pF ” and just as i did that i got a bright red hot nail in 33 secs
I think its because when you connect a coil directly to the secondary it acts as an inductor and introduces a phase difference but when you keep adding capacitors it keeps canceling that reactance and at a certain value totally cancels it out with no reactance left exept that of the work piece.. 🙂
Great news, Salar!
Can you take some pictures with your setup? I’d like to post them here.
Hy, Mr. Motisan can I ask how mutch Watts is a power of work coil?
Thank you.
not more than 100W
For the work piece to get heated up properly the inductive reactance should be equal to the capacitive reactance (resonance). Then only the L-C circuit behave like a resistive circuit. This can be achieved somwhat easily in case of PWM modulation circuit where is it is possible to adjust the swithcing frequency. With this simple circuit, there is a need to adjust the capacitor value by trials to get achive the nearest resonance frequecy. Still it is a very good circuit for experimenting on Induction heating.
Mr. Radu,
what is the temperature upto which you can tak the workpiece?
and can you please tell me the largest size of the workpiece that can be used in this setup?
I’m an Engineering student making an induction hardening machine as a university project. I’ll be eagerly waiting for your reply.
Happy new year for all of you..
Mr. Radu can you give me more information about the circuit. How does it work? What is the type of circuit?
helow sir i well expyriment induction heatar 12volt plz giv me daigram and full informeton.thenk u
diagram is included in the article.
Mr Radu,
Can you please post a more clearer diagram. Some of the components types are not visible in this schematic.
Mr radu,
İ agree with my friends and can you give me more information about the circuit. How does it work? What is the type of circuit?
Mr Radu, what type of Capacitor and power did you use?
Hey I’m a builder and some what of an inventer but unfortunately I have to see most things built to completly understand them could you plz make. Step by step instruction video exsplaining how it is put together and how it works and if adding compasitors would help the design I would apreceate it sry for the bad spelling
I was also wondering if a coil of copper tubing would have any diffrence on its heating ability
radu,
i found your coil while googling for induction coil designs. first, i’d like to commend you on constructing what looks like an extremely well constructed coil!
i’m looking to build an induction heating color similar to yours, but for operating at around 1 MHz rather than 100 kHz or so. Do you have any suggestions for modifying the design [especially on the coil end]? I would also appreciate it if you had any references for the coil design; I’m a bit unclear about a couple of parts of its operation.
thanks!
ad
Daca n-as fi citit “Chirita” sau “Momente si schite” in care autorii scot in evidenta printre altele, snobismul si “limbismul” poporului roman, as fi fost mirat ca romanii care fac si ei cate ceva si dau pe net, scri in engleza, ca asa e cool.De aia e Romania unde e si Germania acolo unde merita.Pe langa alte calitati evidente, neamtul nu se caciuleste in fata nimanui.Daca face ceva, si face, nu scrie sau vorbeste despre acel lucru in engleza ca sa se faca inteles; cine vrea sa inteleaga ce-a facut ori stie germana ori foloseste traducerea de pe Google.Dar romanul chiar daca stie ca se poate acest lucru, e mai cu mot, scrie in engleza – se apleaca in fata strainilor, cat poate de mult.
Roamania e o tara frumoasa, pacat ca e locuita de astfel de romani.Nu avem demnitate si respect de sine.
Doar indienii din India, penntru ca au fost colonizati de englezi, mai fac acest lucru, dar ei au o scuza.Cate scheme si filmulete postate de straini am vazut pe net, foarte, foarte putine am vazut sa fie vorbite sau scrise in engleza.Mi-e rusine cu astfel de concetateni.Romani fara demnitate !
Mihai, cred ca te-ai ratacit,
Scriu in ce limba consider eu ca e potrivit, cum de te-ai gasit tocmai tu sa te impiedici de asta, si mai ales cum iti permiti sa ma abordezi pe un astfel de ton? Sunt pentru o comunicare usoara iar cum blogul meu e despre tehnologie, si in lumea stiintifica se foloseste engleza, in acest fel se pot schimba rezultate si se pot imbunatati modelele actuale. Vezi ca mai demult, in mediul stiintific se folosea latina, sper ca nu esti suparat si pentru asta.
Cat despre rusinea cu concetatenii, poate ai vrut sa spui ciuda. Dar asta nu e problema mea.
Te poti intoarce la Caragiale care e o lectura usoara si pe alocuri amuzanta, dar la modul cum o interpretezi faci act de subcultura, si nu te prea ajuta. Ca sa vezi cine vorbeste de snobism.
Mihai G.
El e suparat ca nu am scris in romaneste, si sare la tot felul de acuzatii, facand o scurta incursiune in natura fiintei lui – erodata de prea multa invidie si ura pentru semeni, si uita ca globalizarea i-a adus pe oameni aproape. Ii lauda pe Germani, si arunca cu noroi in ai lui, iar la urma tot el se necajeste ca nu-s romanii acolo unde ar trebui sa fie.
Cate controverse si situatii paradoxale in gandirea dansului, dar noroc ca e un om educat, care l-a citit pe Caragiale ceea ce i-a completat imaginea asupra societatii si a lumii in general!!
Mesajul il pastrez pentru ca arata un exemplu de om prost, care daca n-are nimic bun de zis, isi gaseste.
Coudl this be scaled up to the diameter of a soda can or slightly larger? I am thinking of housing a vertical steel tube with crushed soda cans inside, in the center of the coil. Then bring it up to the melting temperature of the aluminum, which would melt through a grate on the bottom, but not hot enough to melt the steel. So with a stack of crushed soda cans being put in from the top, they will melt through into a collection bucket on the bottom.
My question is if this is able to be scaled to the size, about 3-4 inches in diameter, and what factors would need to be addressed at that size?
A very good question, eric. I suggest you try this relatively simple design and see how it goes for aluminim.
Generally speaking, feromagnetic metals absorb more energy from the induction heater but aluminum should work fine as well, since crushed cans have a small mass after all.
The aluminum idea is very good. You could have a large plastic bucket of water beneath an oven rack. On top is your large plastic PVC pipe filled with cans. You may not even need to crush the cans? Turn on your coil which is inside the large pipe with the cans. The cans melt down fall/flow through the oven rack and fill the bucket with aluminum shreds.
Is that about what you are doing?
Good suggestion, Brian. This would help eric have an automated recycler for cand, and indeed I also don’t think the cans need to be crushed first.
Hi,
Great article and project. Thank you for sharing this.
When I did see this article, my first thought was, even before reading, is this powerfull enough to melt aluminium?
So, is it possible to get enough power/heat to melt the aluminium to let it flow into a mold? How can we make it more power full? By doubling the fets and place them parralel?
Also is the first schematic more powerfull then the second one?
Again thank you, and I hope that you keep updating this topic.
Also Eric and Brian, please keep us informed about your results.
Great little inductor.
The transorfmer you made, is it possible to use a car ignition pencil coil?
Thanks
I have made an induction circuit. But it no work.
My power supply produces a strange noise when I turn on the circuit, I think it due to a short circuit.
I use as power supply a battery charger, It produces 12Volt and 60Amp Max.
On the link below there is a schema of my actual circuit:
https://www.dropbox.com/s/n5a6u2s76s03tzy/Actual%20circuit.jpg
I use a NE556 to produces a single wave signal of 60KHz but
I must put a diode on the output because the signal go under 0V, I think my diode isn’t a high speed diode.
I apply the Radu’s circuit with my components.
On the link below there is a schema of the new circuit:
https://www.dropbox.com/s/xb6iywdowt6lnsx/New%20circuit.jpg
Please help me and explain me why my current circuit doesn’t work.
Thanks
Output from the 556 is a square wave, which means that without a filter and protection of Mosfets they will probably burn. Also mosfets switch only one signal period, you must do some kind of bridge circuit. For the transistors is square heavy load. Also mosfets switch only one signal period. In addition, the MOSFET will switch to the coil, which is not very good. And mainly! coil resistance is only a few milliohms, which means that at the moment when mosfets switchs, there will flow a very huge current through them. that means that they will be burned in second. ZVS is the best solution for circuits like this. sorry for my english 🙂 have a nice day
Thank you they have already burn but I will try to recreate a new induction heater with this schema:
http://uzzors2k.4hv.org/projectfiles/seriesresonantinductionheater/Power%20Stage.GIF
find on this website:
http://uzzors2k.4hv.org/index.php?page=seriesresonantinductionheater
new schematics MOSFET Royer.
Hi Radu,
I was recently told about and built a self oscillating push-pull transformer circuit. I think you might find it useful. It works well and is simple.
Here’s the link: http://electropub.wordpress.com/2013/01/13/12vdc-to-10kv-dc-power-supply/
Peace.
My English is poor, hope that we can too understanding.The material on this site is good, but do not know how to register it?I only see the landing place.I hope to learn more here,祝大家生活愉快!!
@alan that is the same topology as presented in this article. Namely a royer oscillator. See my High voltage power supplies article to learn more on this topic.
Hi Radu,
This is a pretty good circuit, how would you modify this if you had a 1-cell lipo battery as your power source?
Thank you for advance for your time.
Dave
I would probably use bipolar transistors instead of the mosfets so that oscillation can start at lower voltages.
I also have a microcontroller in the circuit that I can use to output PWM signals to toggle the fets or I can use a half bridge for that purpose. I am afraid if the bipolar wouldn’t be fast enough or to be able to handle high current. Do you have any bipolar in your mind that could do the job?
Thanks
what current levels do you have in mind?
not more than 10A, I need to get the metal inside to 150c and I am using a 1-cell, 5A, 20c lipo
I’d start with two TIP3055 transistors, but others such as TIP41 should be good.
Thank you very much, I will update you on my progress.
sounds good, I’m curious to see what you’re up to.
Hi Radu,
May I ask where you got the 2000uh choke? I couldn’t find the manufacturer based on the numbers on the picture that you have provided. Any info on this would be great.
Thanks
@David, It is not a crucial component, feel free to replace it with what you have .
Hello Radu,
I have been following this thread and I want to experiment with your circuit. Please, what is the function of capacitors in this circuit as stated by Salar. In your circuit, what is the function of the 0.47uf?
Thank you.
What salar is saying there is that he connected more capacitance in the circuit. So feel free to replace the 0.47uF with a higher value one, let’s say a 2uF/400V.
I was looking for an induction furnace suitible for melting platnium which run at top frequency between 50 and 60khz because the melting point is 3200 degrees ferenheight. Will your induction furnace ge that hot with a crucible in the middle? Because if it does I would really like to download all the schematics along witn a parts list. If that is still possible.
The typos seen above are so bad because they a premature epostulations. I believe it was also to vague for me to get my proper point across or the right questions answered.
I was looking for an induction furnace to purchase, also one suitible for melting platnium. All the machines I found run at 50 and 60khz allowing them to reach 3200 degrees ferenheight (the melting point of platnium) When I found out that the price of the machines are $75000 to $250000, I decided that building one would not only be fun, but it would be quite a learning experience. I can read schematics and I believe I learned enough about electronics in college to be able to pull this off. However, I would still be considered a greenhorn to this project and will need some help from anywhere I can get I could really use all the detials missing if anyone could point me inthe right direction. More shcematics wiring diagrams parts list. And if anyone has heard about the current being ran through the crucible to increase the heat. This was mentioned in the history of platnium melting found on google.
Hi John. I didn’t try to melt platinum. But I don’t see why it shouldn’t work. This is a simple circuit and a good starting point for you to try.
Radu
The typos seen above make my post to vague for me to get my proper point across or the right questions answered.
I was looking for an induction furnace to purchase, also one suitible for melting platnium. All the machines I found run at 50 and 60khz allowing them to reach 3200 degrees ferenheight (the melting point of platnium) When I found out that the price of the machines are $75000 to $250000, I decided that building one would not only be fun, but it would be quite a learning experience. I can read schematics and I believe I learned enough about electronics in college to be able to pull this off. However, I would still be considered a greenhorn to this project and will need some help from anywhere I can get I could really use all the detials missing if anyone could point me inthe right direction. And if anyone has heard about the current being ran through the crucible to increase the heat. This was mentioned in the history of platnium melting found on google.
WHY DID YOU POST MY COMMENT MULTIPLE TIMES? AAAAAAAAAAAHHHHHHHHHHHH, WHO GIVES A RATS ASS ANYHOW.
HOW LONG IS SONETIME? THAT SOUNDS TO LONG FOR ME! HOW ABOUT THIS? YOU DIRTY RAT COPPER!…TOP OF THE WORLD MA!…..HEH….HEH……….MA?….MA?…..YOU’LL NEVER TAKE CODY JERRET!……INSN’T THAT RIGHT MA??…..SEE?…SEE?….SEE? YOU DIRTY RATS! YOU HAVENT SEEN THE LAST OF CODY JERRET! SEE?YEH,,, HEH HE HEH HEE MA? …….MA?!!!!!!!!!!!!!WHERE ARE YA MA? SEE? MA? HELP ME! MA? MA? EEEEEHHHHAAAAOOOOOOOOOOHHHHHHHHHHHAHAAAAAAAAAAAA!!!!!!!!!!!!!!!!QUOTES FROM WHITE HEAT JAMES CAGNEY TO OLD FOR MOST OF YA SEE? YEAH! DON’T GIMMIE ANY OF YOUR LIP PIPSQUEEAK! MA? MA? MA? SEEE? MA? MAA MAAAAAAAAAAAAAAAAAAAAAAAAAAHHHHHHHHHHHHHEEEEEEEEEEEEEEEEEEEEEEEEEEeeerRRRRRRRRRRRRRRRRRRRRRRRRRRrRRRRRRRRRRGGGGGGGGGGGGhHHHHHHHHHHHHHHHH
I am assuming that the higher frequency is what allows such high temperatures, but I am concerned that it may also be in using the right crucible, because I also read that the crucible must be zircon and have the current running through it.
Yes the crucible must be carefully selected, I would say ceramics, regarding zirconium I have no such experience, so can’t say. Still I encourage you to try building this, even if you don’t get to melt your platinum, you still learn a lot on what can be improved to get you there.
I am trying to view your schematics to build my own induction heater, but the schematics are not very clear and therefore hard to read. Do you have a higher resolution image that you can email me or upload here? Thanks!
Would it be possible for you to give me a complete parts list for your induction heater set up? I am new to induction heaters and this would be a great help to me to just get a parts list so I know exactly what to buy.
Hi Radu,
can this setup be used for heating water in a container. i.e a container being wound with this coil and the current to be delivered at less than 3 Amps. will it work.
@Robert: I uploaded a higher resolution circuit diagram image.
@gobinath: yes
Buna Radu,
Ma poti ajuta cu o schema similara cu cea postata de tine mai sus, pentru incalzirea unor bucati de max.1cm. in diametru.Din cele citite de mine ar trebui sa fie undeva la 27 mhz.
Cu respect, Nelu
Scuze -am uitat sa mentionez materialul-plastic
Salut Nelu. cu ce anume pot sa te ajut? Montajul de mai sus e un bun punct de pornire!
Radu,
I tried the circuit and i couldn’t make it work :/ Just Mosfets are getting heated. The aim is heating the metal workpiece not the mosfets right? 😛
Do you have an idea what am i doing wrong?
Thanks
Cagdas
@Cagdas, send me a few pics so I can have a look over what you’ve done.
https://www.dropbox.com/s/g80sbe8b7shymks/Y%C3%BCksek%20Frekans%20001.JPG
https://www.dropbox.com/s/6uepu6g6uvn1xll/Y%C3%BCksek%20Frekans%20002.JPG
https://www.dropbox.com/s/16fb8x572rhrsb0/Y%C3%BCksek%20Frekans%20005.JPG
At the beginning i used one 0.47uF 65V Capacitor than i rewatched your video and i saw you have 2000V capacitor so i add more of them just to see if it will change something but it didn’t. I know the quality of my circuit is bad.
Thanks for the pictures. The components you’ve used seem ok, so I can only assume there’s a human error factor. Double check or triple check your circuit. Make sure your power supply is 12V @10Amps at least.
I have checked it many times but clearly i am missing something. I set my power supply to 12V @ 10 Amps as you said, first i saw 0.2A and mosfets were not even warm than i turned off and on again the power supply, and i saw the circuit takes 9 Amps and in the same second mosfets got burned. So i am obviously doing something wrong but to figure it about where is the problem, is there any tests that i can locate the problem?
Thanks for you quick replies.
hi mr motisan
is there any place where i can see how the coils looks liki in the oacillator that works without the separation transformer
thank you
arree
south africa
hallo mr motisan
another q, the oscillator without the separation transformer, will it be able to melt about 75 to 100 ml of lead and if, can i put the lead in any type of metal container inside the work coil
thank you
arree
Hi all-
I can get a screwdriver very hot but not red hot. It’s not my transistors that fail – it’s the cap bank that heats up wicked hot. Any thoughts as to how to minimize capacitor heating? I’m using film caps.
-David
Hi David,
You will need to increase your cap bank – for higher voltage , put the caps in series, but also add a few series in parallel to increase the capacitance and make it able to work with higher current.
Me parece un muy buen desarrollo. Bastante simple y confiable. Felicitaciones. Saludos.
good day mr. Radu! i have to ask this: what do you mean by the recovery time? do you mean the reverse recovery time in the datasheets?
@Francisco: thanks.
@abraham: for the diodes, yes.
Good day Mr. Radu Motisan!
I am so happy that I will be working on your project. I want to make one. I just had a problem with my power supply. I used a DC power supply. I measured it to be 18V. When I connected it to my circuit, it dropped to 5V. gosh!
I am humbly asking for your help and expertise on this matter.
I am planning to buy this 200Watts transformer with the following specs:
Type: Auto
Input: 220VAC,6Hz
Ouput: 110VAC, 60Hz
Capacity: 200VA
Is this enough to run the whole circuit and make a good output?
Thank you sir. I am hoping for your immediate response.
The input is: 220VAC, 60Hz.
Hi mr Mortisan. thanks for your post about IH. is it possible to use other type of working coils, e.g pancake type, with this circuit?
@Abraham your initial 18V supply was probably too weak. You need a supply that can provide at least 5-6Amps.
@Zenal yes
Radu,
I have built this circuit multiple times with no luck other than the fets heating up. Using the identical components in your schematics. I just would like to confirm with you based off your response to Abraham. The PS must be at least 5 Amps? My end use goal is i need to get a similar setup running off of 4V/1A max.
What for is the BYV26E diode? Thank you sir .
sir, can you advise me to make high frequency heating coil and also wanted to know is it possible to reach high temp like about 1700 deg celsius using induction coils
thanks If these temp can be reached what is the current usage ?
i’ve made thi stuff according your scheme. its work well with work coil that size. i want to make bigger work coil with cooper pipe. the question is how much the inductor needed? and the capacitor? what is the formula? (i used 10 A transformer) please respon, tis is really important. thank you.
I have a very similar circuit running very nicely the main difference being the values of the tank circuit components. My circuit runs at 405KHz. I have the requirement of ramping up quickly, then running at a controlled temperature. I have tried inserting PWM control of this setup by draining to ground through a diode just after the current limiting resistors and by interrupting power at the source. Neither worked. The drain method failed to break the oscillation and the circuit just kept heating which surprised me…I really expected that to work. I am guessing that the internal resistance of the drain diodes allowed enough voltage in the circuit to energize the gates on the MOSFETS. Interrupting the power at 200Hz blew up all 3 ICs…thats not good. Has anyone been successful controlling this circuit and how?
Thanks!
Paul
I built your circuit and finally got it working. Kept burning up MOSFET’s, Had to use STP40NF10 rated 50 Amps.
I am sending the screen shot of oscilloscope, getting a good sine wave but I believe I’m not getting zero volt switching (ZVS). I think that is what is heating the MOSFET’s. What is your opinion of the Scope Trace?